Google stats

Label / Tag Cloud for this Blog

Showing posts with label BBSC 303. Show all posts

Tuesday, July 19, 2011

Nanjing Sifang Art Museum | OpenBuildings

Nanjing Sifang Art Museum OpenBuildings

Check out this building. If we were still doing the Digital Craft Museum modelling - I'd want to add this insane building to the list - just so we could explore the interior.

Personally, having visited the Kiasma building, I am prepared to give this folly the benefit of the doubt. Kiasma was uplifting and exciting - as well as a trick to model.

Sunday, January 03, 2010

Wednesday, May 27, 2009

NYT writes: Renzo Piano Embraces Chicago

An estatic review of yet another Piano building. Or is that - yet another ecstatic view of a Piano building...


Certainly worthy of a look for modelling. Any building that brings the New York Times Architecture critic to write "The beauty of his designs stems from his stubborn insistence that the placement of a column or a window, when done with enough patience and care, brings us a step closer to a more enlightened society." has to be worth a second look. 


Check out these links: 


BBSC 303 Lecture / Workshop

Theme for the session: learning to relax ... and solve the problem.


Tactic: when an error message or dialogue pops up: READ IT and GOOGLE IT.

Specific example issue:

Export reliably to LightStudio:

Unfortunately, the Radiance renderer underlying 3DS Max cannot work with the object names that ArchiCAD or Revit are able to create. The work around is to Export to AutoCAD .dwg format. THEN in 3DS Max (9 if you are using Light Studio) using the AutoiCAD Legacy File Import format. This works for most people.

Those who have other issues often find it is due to some other fault with the way the CAD model is organised. One example we examined was the "set overflow in addobject"  error message: arising from objects being too close together. This can often be a result of the model having two objects that are co-planar (e.g. two identical copies of the same object).

A further strategy to be explored - particularly if your Revit model has "massing" elements in it - is to select to export ACIS solids rather than polyface meshes...

Use Max efficiently:
NOTES:
Many people are looking to use various combinations of lights (sun+sky) and cameras to create their renders. Rather than save many different Max files each with its own sky (and camera) - the option can be used for switching light sources on and off; and the option can be used to save 'scene states'. This approach permits the use of the option to set up a single job that runs (perhaps overnight?) to render all pictures (scenes) ina list.

has a "Multithread" option for using all the cores of a multi-core processor.

Select a bunch of objects and type a name into the Selection Set box in the tool bar - tis saves this selection set under this name.

The geometry file can be made much more efficient if you have multiple copies of objects such as chairs, light fittings, decorative facade elements, then making them into an array in the original CAD program, or in Max, ensring that all copies are 'instances' not real copies.

Render in mental ray and in Light Studio from the local D:\drive - it is 5 to 10 times faster than via the network to your 'My Documents' location. (Don't forget to keep the D:\ drive files and transfer then to the next computer's D:\ drive.


Friday, May 08, 2009

BBSc303 Lecture, 5th May 2009 - Sam Curtis

3dsmax mental ray Setup Workflow  (similar workflow lightstudio, different daylight systems and materials)

1) Setup your units. Make sure you are working in real world units.

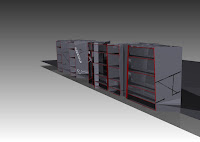
2) Import your model (via FBX for Revit). Check the units (Measure tool under the tools tab)

3) Create a Arch & Design (mi) 'matte' material (from the template), 50% grey. Apply to the entire scene.

4) Hide the glazing in your windows, or create a Arch & Design (mi) 'Glass: Thin Geometry' material (from the template)

5) Create a Daylight system. Say yes to both questions when asked.

6) Make sure the Compass Rose is not too big, and do not drag the daylight system out too far from the scene. Keep it small,just twice as high as your buildling.

7) Setup the correct location for the daylight system. Change the day and time to something suitable.

8) Set up your camera views.

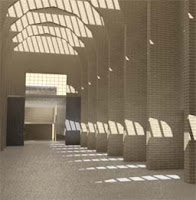
9) Go to Exposure settings and change exposure pre-sets to 'Physically Based Lighting, Indoor Daylight'

10) Bring up the render dialog box. Set render size to 320 x 240. Turn on finalrender and set to Draft. Set image anti-aliasing to Draft (Min 1/64, Max 1/4).

11) Render.

12) Adjust the sun position. Change the time in the daylight system until the sun is in the correct position. Re-render and repeat until satisfied.

13) Adjust your exposure. Go to Exposure settings and again and change the exposure setting (Exposure Value (EV)) and click Render Preview. Adjust the exposure setting until satisfied.

14) Create your materials for your walls and floor.
For gib painted walls create an Arch & Design (mi) 'matte' material (from the template) with 80% white. This is the reflectance value real white walls.
For a wooden varnished wall, use Arch & Design (mi) 'Satin Varnished Wood' material (from the template)

15) For the rest of the scene, use ony Arch & Design (mi) or ProMaterials. There are ProMaterial libraries you can load with a wider range of pre-defined realistic materials

16) When doing final renders, increase the render size, anti-aliasing the final render quality.


Useful Keyboard Shortcuts

F10  Render Dialog
F9  Re-render last
F12  Transform Type-in Dialog (move, rotate, scale)

M  Material Editor
H Object Selection
Q Select
W Move
E Rotate
R Scale
Alt-Q Isolate Current Object
Shift-W Turn off navigation wheel
Ctrl-D De-select current selection
Space Lock selection

Saturday, April 11, 2009

Materials in Light Studio - procedural materials; and

Procedural issue covered (from Light Studio / Advanced / Materials tutorial online at the course info web site):

  • Loading the light studio material library from the P:\LightStudio folder.
  • Opening the .cal file that is applied and changing the scale of the materials listed...

Planning the Modelling - and Materials basics in 3DS Max mentalray

Lecture April 1

Topics covered:
Set up a consistent underlying structure for the collaboration:


  • structural grid?

  • plan AND section joins

  • scan images and overaly and cross check dimensions

  • this is a model, not a set of construction drawings

  • plan to model only what is to be starring in the images at the end

Materials in computer graphics were also examined in the context of modelling. Starting with the online notes about the use of diffuse, bump, displacement and opacity maps within computer graphics, we went through:

applying this picture:


As a diffuse map:


As a bump map:


As a displacement map:


And applying this image:


as an opacity map:

Sunday, March 29, 2009

Munch Museum on waterfront in Oslo - another model?

image

Blogged with the Flock Browser

Atlanta's Centre for Covil and Human Rights - another building to model?

image

Blogged with the Flock Browser

Movie about Rem Koolhaas coming to Wellington

Rem Koolhaas designed downtown Seattle's Central Library on Fourth Avenue.

Can't find the times on the Paramount web site, but according to Wotzon, on Fri 10 Apr 11.00am and Sun 12 Apr 1.00pm at the Paramount in Courtenay Place a documentary will screen about the former film director, author of Delirious New York: A Retroactive Manifesto for Manhattan and architect of what to me embodies in one building the best and worst of auteur architecture: the Casa da Musica in Porto:


Blogged with the Flock Browser

Architectural Firms Compete to Design African American History Museum - washingtonpost.com

The Washington Post writes (28 March 2009): "The future National Museum of African American History and Culture -- as envisioned by competing teams of architects -- will most likely include water features and music halls, evocations of slave ships and the African past, and vistas acknowledging its important, monumental neighbors.

Perhaps not enough information to make a model - yet...?

Blogged with the Flock Browser

Wednesday, March 25, 2009

Web 2.0 - 2009

The lecture today trawled through the concept of Web 2.0: A google 'define': search produces the following Wiktionary definition: "The second generation of the World Wide Web, especially the movement away from static webpages to dynamic and shareable content".

The original Web 1.0 was invented by Tim Berners-Lee at CERN in the early 1990's. The arrival of Mark Andreesen's Mosaic web browser around the same time created accessible content: the first mix of text and images on the web, proving to be so powerful a trend that it "made the front page of the New York Times business section".

Examples of interactive web sites discussed are:
Flickr
Twitter
Blogger
del.icio.us

Technologies that are useful in the Web 2.0 world include RSS (Really Simple Syndication) feeds and folksonomies built on simple tags [A tag is a non-hierarchical keyword or term assigned to a piece of information (such as an internet bookmark, digital image, or computer file). This kind of metadata helps describe an item and allows it to be found again by browsing or searching. ..]. The highlighted links at the top left edge of the BBSC 303 Digital Craft Course Information web page is constructed from an RSS feed reporting my Google (RSS) Reader subscriptions under the label 'architecture'. Just below this is a feed of my most recent del.icio.us links.

Other interactive web sites / services include:
facebook
myspace
bebo

In addition, we watched a couple of youtube videos:


The point? Assignment 2 requires you to "... actively document and collaborate online with your team partner and present the development of your project online in the form of a website." The goal therefore is to create a blog EACH, reporting your collaboration. The technologies of Web 2.0 are what will make our web sites readable, informative and able to be navigated simply.

The lecture concluded by referring back to the simple web page tutorial linked to the course web site. We covered again the use of HTML (hyper-text markup language) to place around text or media that affect its display. In particular we looked at the hypertext linking tag.

Sunday, March 22, 2009

File translation issues:

The lecture on Tuesday 17 March and the tutorials on Thursday 19 March focused n file translation issues between the different original file formats in CAD and the 3DS Max file formats.


CAD 3DS Max 9 for LS 3DS ax 2009 for mr
Archicad Export to .dwg: import via Legacy dwg Export to 3ds; import
AutoCAD import via Legacy dwg import via Legacy dwg
Revit export to dwg. import via Legacy dwg export to fbx; import via fbx

NOTE: as covered in the online tutorials and in the tutorial class on Thursday, the Right Hemisphere product Deep Exploration can be used to clean up the object names in 3DS Max so that the renderers work properly.

Lecture 2: 2009 - Rendering with Max

The strategies for completing a rendering - a summary of the approaches that need to be adopted to Render within Max.

Basic concepts (summarised from tutorials):

  • Global illumination - Radiance (Light Studio) and mentalray
  • materials are specific to the renderer
  1. light studio materials for LightStudio
  2. Pro-materials for mentalray OR
  3. Arch and Design materials for mentalray
  • LightStudio only works in Max 9
  • mentalray works in Max 9 and 2009: recommend the latter
  • in both renderers define a sun and sky in very similar ways
  1. Light Studio: Create tab/panel: Systems. Pull-down Light Studio option. Select Daylight. Choose location; date; time
  2. mentalray: Pull Down menu. Lighting System wizard. Select tab. Create. Choose location; date; time. Accept options to make sky match sun and to set exposure for daylight with yes.
  • in both renderers the 'indirect' illumination in bounces (mr) or as the 'indirect' box (LS) need to be a minimum of 2 outside, and 5 to 7 inside.
  • In LS there are two render types: "Simple" FOR PREVIEWS ONLY and "Expert" for producing the actual renders.
  • In LS there are many different materials, but 'plastic', 'glass', metal are the ones normally used. Have fun making a metal walled Gehry building!
  • The LS manual is siomple and easy to read. The two tutoriala online should take you through all you need to know (the second 'advanced' tutorial is about lighting studies, but the materials section is useful for this course)
  • mentalray has 'Global Illumination', 'Final Gather' and 'Caustics' settings: for this tutorial and most of this course, we will ONLY use 'Final Gather'.

Lecture - 1: 2009

Topics covered in the lecture:

The Course Objectives
The Tasks to be completed to meet these Objectives

The Assessment Contract - and its role in reducing stress and workload
Workload management

The links to the past year's work:
  • The Digital Craft BBSC 303 section of the www.arch.school.nz web site for models created between 1998 and 2005.
  • And in particular the 'buildings' summary of these models.
  • Plus the 'Reasonate' web site created by David Harrison in 2006
  • Plus the Blogger web sites created by 303 students in 2007
Strategies for completing the tutorials and for choosing a partner to work with on the assignments.

Friday, May 25, 2007

lecture topic - May 23 2007 - Rendering issues and ideas


Today Justin presented his Light Flow meter research with a request that one of your Light Studio renders is run with the light flow meter (see above from Kit Cuttle's book on Lighting) inserted into the picture taking up 30% of the view... AND the RTRACE render commands are followed to calculate the light intensity on each of 6 cardinal points of the white sphere.


Thursday, May 17, 2007

lecture topic - May 16 2007 - Preparing final hand-in

The topic was examining images from the past to develop a plan to present well.

We talked about:

Ensuring that the images presented in the final render set developed a theme about the building. The goal was to try to focus on presenting in images some form of narrative that enhanced your reader/viewer's knowledge of the building or of the process of modelling or of the process of rendering... Examples that were presented of acceptable foci for a themed page were:

  • comparison of the Light Studio and the Mental Ray renderers (e.g. time vs quality)
  • an analysis of the way(s) in which daylight reaches the interior through sections and other views
  • an analysis of the architect's writing about his/her building is revealed in the form /light interplay
  • an examination of the role of light in the progression one makes through the building from outside to in or from gallery to gallery ...
  • representation / revealing of the qualities of light in the major spaces in early morning / late afternoon - summer / winter - night / day - sun / overcast conditions
  • interrogation of the design principles - formal / rhythmic / organic / asymmetric - affect the flow of light
We noted yet again that there is a requirement in the assignment to include the following (NOTE again, that both renderers must be used):

Assignment One - Part B

  • Minimum
    The fifteen rendered images should be visible on the website in thumbnail form. Appropriate background image(s) to represent the view out from the building, or appropriate "textures" applied to art works in an art gallery or similar contextual information will be required.The web page should also contain appropriate text documenting: your name, the name of the architect, the course, the date and the name of the modeling and rendering packages used to produce each image.
  • Below Average
    All above, plus: at least ten renderings using Autodesk Viz to simulate realistic lighting conditions in the space(s) in a minimum of two different ways using Global Illumination and not (7 of one approach: 3 of the alternate is the maximum deviation from the desired 5:5 split in pictures).
  • Acceptable
    All above, plus: documentation of the image differences and the settings used and time taken to render between the two Viz renderings approaches.
  • Average
    All above, plus: all fifteen renderings using AutoDesk Viz/Lightscape AND Rayfront/Radiance to simulate realistic lighting conditions in the space(s) NOTE: with the arrival of the LightStudio plugin, it is important to recognise that the split here is between the (Mental Ray) PHOTON MAPPING rendering approach and the (RADIANCE) BACKWARDS RAY TRACE approach. Thus the different renders are Global Illumination within the Mental Ray Renderer in Viz and Radiance with the Lightstudio renderer in Viz.
  • Good
    All above, plus: use of AutoDesk Viz/Lightscape AND Rayfront/Radiance/LightStudio to simulate realistic lighting conditions in the space(s) with some additional images at night (say 6 daylight rendered with one program and 9 daylight with the other, plus 3-6 with artificial lighting); and all thumbnails link to larger minimum 1280x1024 images on your personal web site.
  • Above Average
    All above, plus: association of the idea, concept or theme being communicated with a critical idea, concept or theme: e.g. analysis of relationship between this building and others by the same architect or others from same era; or analysis of natural lighting via sky and sunlighting; or examination of systems of circulation through buildings and demonstration of which system this building belongs to ....
  • Very Good
    All above, plus: use of Autodesk Viz/Lightscape and Rayfront/Lightstudio for four of the views showing how the natural lighting models compare between the two rendering programs.
  • Excellent
    All above, plus: ... you tell me (the possibilities are endless)?
I also noted that the software for hdrshop is available for use on the Course Information directory. This allows one to import a series of identical images of different exposure level and amalgamate them into ONE High Dynamic range Image. (i.e. to take a series of photographs of a sky and thus use it as a light source for ones scene as explained in this online tutorial)


hdrview is available on the same R:\esources directory if one wants to view the hdr image. There are plenty available online - just check FLICKR.

Also we examined the role of procedural materials in making more interesting images than can be achieved with materials which are merely pictures pasted onto surfaces... This work from Irena a couple of years ago is an illustration of a procedural texture in Radiance - the underlying render engine to Light Studio:


And finally, a couple of words of caution:
  1. bringing files into Viz successfully is only part I of the render process. Make sure also that you can render in Light Studio and in Mental Ray. If your object names are very long because of the manner in which you have brought the model into Viz, then the Light Studio renderer will not work. You must fix this somehow by altering the layer / object names in the export process, or by importing the file into Deep Exploration and then re-exporting in the simpler form...
  2. As noted at the beginning of the year, Light Studio only work in Viz - if you have exported to Max for mental ray, then be aware that you will be competing for a much smaller number of licenses than with Viz come crunch render time AND you will still have to export that model and read it back into Viz to use Light Studio
  3. There is a major flaw in the Viz 'section' tool that stops it from producing sections that are orthogonal to the building - because sections are created by setting 'cutting planes' in Viz/Max camera definitions. The work around is that one can create the files in Viz and with the mental ray renderer run the 'render to texture' option. Then save the file out as a 3ds format - with named camera views. THEN within Deep Exploration (DE) one can set up the section plane (+X) rotated and placed where it shows off the interior best and from within DE... Witness this simple B&W model rendered with a cutting plane:


Footnote: link to hdr render and good caustics for water in same tutorial when compiling this blog.

Wednesday, May 02, 2007

Lecture 8 - Digital Craft Render Details

Concepts covered in class today:
Global Illumination and Final Gather in Mental Ray

  • avoiding long render times for outdoor renders by enclosing the whole scene in a hemisphere
  • making the hemsiphere normals face inward so it is visible
  • using a map on the hemisphere as a background - improvement over an environment background
  • Final Gather as a means of producing quick outdoor renders
  • 10,000 minimum photons may produce blotchiness which may be 'solved' by FG but may not
  • creating a light that ONLY shines on selected objects to illuminate the background sky...
HDR images
  • what are they?
  • Debevec and Ward websites as resources for their work on HDRI
  • use of HDR as output that is flexible from LightStudio
  • Use of HDR images as a source of light in a scene
  • (as an aside - use of a map in a light definition in Viz as a means of cheaply creating shadows)
  • requirement to include an HDR image in the final hand in

Thursday, April 26, 2007

Lecture 7 - Digital Craft Render to Texture / Blogging carefully / Details - details - details

Tuesday 24 April 2007

Notes to a lecture:
Significant time was devoted to working through the example of making the label cloud generator on the class blog work by solving the clues offered by the misbehaviour: the solution was to identify what were relative and absolute link web addresses for the label cloud generator program.

We also went through again, how the blogging process is meant to provide a structure from which to build a final hand in for assignment 2. I referred people to the web areas of the www.reasonate.co.nz projects from last year... Good examples of web pages can be found from the people who did the de Young Museum - Arles Archaeological Museum - Federation Square. Ultimately the process of reporting in one place what you have done and how you have organised yourselves ought to be no more than collecting together the folksonomy tags / labels you have generated.

We noted the importance, now the tag cloud is generating, of yusing and defining tags that make sense to your group for later use by you in reporting how YOU organised yourself in relation to the group.

We touched on the ABSOLUTE NEED to attribute your sources and to remember the concept of fair use and also to remember to attribute all sources on your web site in teh same manner as you would in an academic essay. NOTE: not all references need be electronic. It is entirely OK to publish the source as the name of a journal / book...

We also touched in some length on the output requirements in terms of rendered views of the building. Some will be in Light Studio; some in Mental Ray. Some will be interactive in the manner of the Quicktime VR output of the tutorial, but some will also be interactive using the type of technology that Right Hemisphere offer through the Deep Exploration / Deep Publish software we have in the school. The latter acts more like an interactive game engine built into the web browser allowing people to walk through your design... In this latter case, the Render to texture ('baked' textures) Viz render option will be the most useful.

News View

My del.icio.us most recent bookmarks