Google stats

Label / Tag Cloud for this Blog

Showing posts with label Render. Show all posts

Monday, August 01, 2011

Tips For Improve Your Renders (aleso3d.com)

Now they are saying use real settings. Not that long ago pretty render advice was all about faking it (   http://forums.cgsociety.org/showthread.php?t=170065

And keeping well away from setting for real light:
http://www.amazon.com/3DS-Max-Lighting-Nicholas-Boughen/dp/155622401X

Tips For Improve Your Renders
http://www.aleso3d.com/blog/?p=353
    
---
Sent from Zite personalized magazine iPad app.
Available for free in the App Store.
www.zite.com


Sent from my frustrating iPad
All gloss and no user access.

Sunday, March 22, 2009

Lecture 2: 2009 - Rendering with Max

The strategies for completing a rendering - a summary of the approaches that need to be adopted to Render within Max.

Basic concepts (summarised from tutorials):

  • Global illumination - Radiance (Light Studio) and mentalray
  • materials are specific to the renderer
  1. light studio materials for LightStudio
  2. Pro-materials for mentalray OR
  3. Arch and Design materials for mentalray
  • LightStudio only works in Max 9
  • mentalray works in Max 9 and 2009: recommend the latter
  • in both renderers define a sun and sky in very similar ways
  1. Light Studio: Create tab/panel: Systems. Pull-down Light Studio option. Select Daylight. Choose location; date; time
  2. mentalray: Pull Down menu. Lighting System wizard. Select tab. Create. Choose location; date; time. Accept options to make sky match sun and to set exposure for daylight with yes.
  • in both renderers the 'indirect' illumination in bounces (mr) or as the 'indirect' box (LS) need to be a minimum of 2 outside, and 5 to 7 inside.
  • In LS there are two render types: "Simple" FOR PREVIEWS ONLY and "Expert" for producing the actual renders.
  • In LS there are many different materials, but 'plastic', 'glass', metal are the ones normally used. Have fun making a metal walled Gehry building!
  • The LS manual is siomple and easy to read. The two tutoriala online should take you through all you need to know (the second 'advanced' tutorial is about lighting studies, but the materials section is useful for this course)
  • mentalray has 'Global Illumination', 'Final Gather' and 'Caustics' settings: for this tutorial and most of this course, we will ONLY use 'Final Gather'.

Lecture - 1: 2009

Topics covered in the lecture:

The Course Objectives
The Tasks to be completed to meet these Objectives

The Assessment Contract - and its role in reducing stress and workload
Workload management

The links to the past year's work:
  • The Digital Craft BBSC 303 section of the www.arch.school.nz web site for models created between 1998 and 2005.
  • And in particular the 'buildings' summary of these models.
  • Plus the 'Reasonate' web site created by David Harrison in 2006
  • Plus the Blogger web sites created by 303 students in 2007
Strategies for completing the tutorials and for choosing a partner to work with on the assignments.

Friday, May 25, 2007

lecture topic - May 23 2007 - Rendering issues and ideas


Today Justin presented his Light Flow meter research with a request that one of your Light Studio renders is run with the light flow meter (see above from Kit Cuttle's book on Lighting) inserted into the picture taking up 30% of the view... AND the RTRACE render commands are followed to calculate the light intensity on each of 6 cardinal points of the white sphere.


Thursday, May 17, 2007

lecture topic - May 16 2007 - Preparing final hand-in

The topic was examining images from the past to develop a plan to present well.

We talked about:

Ensuring that the images presented in the final render set developed a theme about the building. The goal was to try to focus on presenting in images some form of narrative that enhanced your reader/viewer's knowledge of the building or of the process of modelling or of the process of rendering... Examples that were presented of acceptable foci for a themed page were:

  • comparison of the Light Studio and the Mental Ray renderers (e.g. time vs quality)
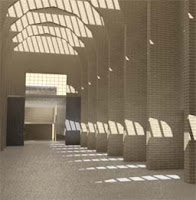
  • an analysis of the way(s) in which daylight reaches the interior through sections and other views
  • an analysis of the architect's writing about his/her building is revealed in the form /light interplay
  • an examination of the role of light in the progression one makes through the building from outside to in or from gallery to gallery ...
  • representation / revealing of the qualities of light in the major spaces in early morning / late afternoon - summer / winter - night / day - sun / overcast conditions
  • interrogation of the design principles - formal / rhythmic / organic / asymmetric - affect the flow of light
We noted yet again that there is a requirement in the assignment to include the following (NOTE again, that both renderers must be used):

Assignment One - Part B

  • Minimum
    The fifteen rendered images should be visible on the website in thumbnail form. Appropriate background image(s) to represent the view out from the building, or appropriate "textures" applied to art works in an art gallery or similar contextual information will be required.The web page should also contain appropriate text documenting: your name, the name of the architect, the course, the date and the name of the modeling and rendering packages used to produce each image.
  • Below Average
    All above, plus: at least ten renderings using Autodesk Viz to simulate realistic lighting conditions in the space(s) in a minimum of two different ways using Global Illumination and not (7 of one approach: 3 of the alternate is the maximum deviation from the desired 5:5 split in pictures).
  • Acceptable
    All above, plus: documentation of the image differences and the settings used and time taken to render between the two Viz renderings approaches.
  • Average
    All above, plus: all fifteen renderings using AutoDesk Viz/Lightscape AND Rayfront/Radiance to simulate realistic lighting conditions in the space(s) NOTE: with the arrival of the LightStudio plugin, it is important to recognise that the split here is between the (Mental Ray) PHOTON MAPPING rendering approach and the (RADIANCE) BACKWARDS RAY TRACE approach. Thus the different renders are Global Illumination within the Mental Ray Renderer in Viz and Radiance with the Lightstudio renderer in Viz.
  • Good
    All above, plus: use of AutoDesk Viz/Lightscape AND Rayfront/Radiance/LightStudio to simulate realistic lighting conditions in the space(s) with some additional images at night (say 6 daylight rendered with one program and 9 daylight with the other, plus 3-6 with artificial lighting); and all thumbnails link to larger minimum 1280x1024 images on your personal web site.
  • Above Average
    All above, plus: association of the idea, concept or theme being communicated with a critical idea, concept or theme: e.g. analysis of relationship between this building and others by the same architect or others from same era; or analysis of natural lighting via sky and sunlighting; or examination of systems of circulation through buildings and demonstration of which system this building belongs to ....
  • Very Good
    All above, plus: use of Autodesk Viz/Lightscape and Rayfront/Lightstudio for four of the views showing how the natural lighting models compare between the two rendering programs.
  • Excellent
    All above, plus: ... you tell me (the possibilities are endless)?
I also noted that the software for hdrshop is available for use on the Course Information directory. This allows one to import a series of identical images of different exposure level and amalgamate them into ONE High Dynamic range Image. (i.e. to take a series of photographs of a sky and thus use it as a light source for ones scene as explained in this online tutorial)


hdrview is available on the same R:\esources directory if one wants to view the hdr image. There are plenty available online - just check FLICKR.

Also we examined the role of procedural materials in making more interesting images than can be achieved with materials which are merely pictures pasted onto surfaces... This work from Irena a couple of years ago is an illustration of a procedural texture in Radiance - the underlying render engine to Light Studio:


And finally, a couple of words of caution:
  1. bringing files into Viz successfully is only part I of the render process. Make sure also that you can render in Light Studio and in Mental Ray. If your object names are very long because of the manner in which you have brought the model into Viz, then the Light Studio renderer will not work. You must fix this somehow by altering the layer / object names in the export process, or by importing the file into Deep Exploration and then re-exporting in the simpler form...
  2. As noted at the beginning of the year, Light Studio only work in Viz - if you have exported to Max for mental ray, then be aware that you will be competing for a much smaller number of licenses than with Viz come crunch render time AND you will still have to export that model and read it back into Viz to use Light Studio
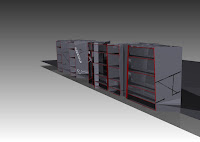
  3. There is a major flaw in the Viz 'section' tool that stops it from producing sections that are orthogonal to the building - because sections are created by setting 'cutting planes' in Viz/Max camera definitions. The work around is that one can create the files in Viz and with the mental ray renderer run the 'render to texture' option. Then save the file out as a 3ds format - with named camera views. THEN within Deep Exploration (DE) one can set up the section plane (+X) rotated and placed where it shows off the interior best and from within DE... Witness this simple B&W model rendered with a cutting plane:


Footnote: link to hdr render and good caustics for water in same tutorial when compiling this blog.

Thursday, April 12, 2007

3rd annual CGarchitect.com Architectural Visualization Competition (AVC)


This 'competition' run by CGArchitect.com has a requirement that people enter their best images now to qualify! Qualification round is April 16-21. Actual competition will be from April 23 to June 30.

To quote the site: If you are one of the select few chosen from the qualification round you will be eligible to compete in the 2 final challenges. Full details and rules for each of these challenges will be posted in the CHALLENGES section of the competition site.

Know anyone who might be up for the challenge? Pass on the link...

In any case cgarchitect ought to be one of those 'favourites' in your del.icio.us account. Especially the 'resources' section which contains tutorials and other information designed to assist the development of better images...

It's rather sad that there are only two images labelled Light Studio in the gallery of 10's of 1000's of images: One of them is by Klaus from Lichtplaner - the people in Austria who produce the software:


There are however, 137 Mental ray images like this from Martin Richardson of Flic Digital:


Tuesday, March 27, 2007

Animation and Story Boards - Digital Craft - 26 March 2007

First activity - watch first seven sections of Visions of Light - a DVD on Cinematography from the Film Institute in the USA.

Second - review the voice over commentary of the start of Citizen Kane - the importance of light and shade, plus the use of the lighted window to link cuts / fades in the intro.

Third - the start sequence of Blade Runner

Fourth - reviewed the videos produced by the students in 2004 and 2005

Fifth - worked through several storyboard examples to understand how to document the planned video

Sixth - explored the nature of the type of presentation to be produced at the interim hand in stage after Easter when we will be presenting our ideas to the Music School's composition students.

Seventh - examined the role sound / soundscapes / music plays in movies - diagetic / non-diagetic - cut on action - sound as the means of transition between scenes...

Rendering - Lecture 5 - Digital Craft - 2007

Global Illumination - reviewing what it is and how to do it in Viz using Light Studio and Mental Ray was the pedagogical goal...

The reality?

We addressed the issue of Simulation, Simulacra, Reality and 'Hyper-reality' - more by reference to the issue of perception and the goals of communication via the image - than by a full review of Baudrillard (Wikipedia ref) or of the hyper-reality of Virtual Reality and High Resolution images.

The basic message was that the focus of image making in the course ought to be on communication of a story NOT merely on some highly detailed, high contrast, ray-traced-within-an-inch-of-its-life image. Contrasting images from Final Fantasy with images from Shrek is highly revealing of this. In the former, the focus and the hype of the original release was about the amount of time spent modelling Dr Aki Ross and the realism of the hair, skin and eyes. The truth is that the non-realistic rendering of the characters and the scenography in Shrek is far more involving of the audience, has far more character development pathis and humour. What is important in Shrek is a focus on the story - not the technology. The same should apply to every image produced in the course.

In addition, we reviewed again the tutorial 'Comparing Rendering Techniques' particularly the portion about the use in computer Graphics of bump, opacity and displacement maps. These can be used in normal scanline rendering in Viz. To produce realistic materials in Light Studio one cannot use these techniques - rather one must use special Light Studio materials with applied 'procedural' files that allow far faster rendering than the map approach.

The bulk of the lecture content was focused on the phenomenon of Global Illumination - a means of calculating light distribution in a space. Photon mapping, Backwards and Forwards Ray tracing and Radiosity were all described briefly.

At the end, the ability of the Deep Publish plug in within Powerpoint, Word and Excel to import 3D files so they remain interactive was demonstrated briefly.

Friday, January 26, 2007

The Neighbourhood

The Neighbourhood
a new architectural cinematography firm. Featured at the Vismasters Design Modelling and Visualisation Conference associated with Imagina uropean 3D visualisation forum - Monte Carlo Feb 2 2007

Tuesday, May 23, 2006

Lecture 10 - Rendering

Lecture today covered the radiosity and light studio and mental ray renders.

I ran through some example tutorials on The VizDepot on radiosity and mental ray.

I noted the length of time renders can take and the need to test setting before embarking on a full render.

I pointed out that a radiosity solution is calculated before a render is done. In the example file a radiosity solution took 43 minutes and the render on top of it took anoth 23 seconds!

The process of 'baking' textures was introduced. With baked textures the lighting solution can be exported to an interative power point 3D model...

Also mentioned was the use of Light Studio materials - for the first time in 15 years, relatively easy - notes on the rendering tutorial on architecture-onlineteaching

News View

My del.icio.us most recent bookmarks